
When you are in the designing or drafting business, you will probably use Revit and BIM 360. Both programs are crucial for your operations. Revit is a powerful and industrial standard software for Building Information Modelling (BIM) and offers many features. It shows all layers and components for any model of the project. Moreover, it contains many features to enable users to turn their projects into Computer-Aided Designs (CAD) with specifications. On the other hand, Autodesk BIM 360 is a cloud environment for teams working on projects. This allows diverse teams to collaborate and work effectively on the same model to include different aspects. Therefore, if you want to work efficiently and grow your business, you need to adopt these programs.
Architecture, contractors, and mechanical or Electrical engineers mostly use Revit to design CAD models. Furthermore, project, site managers, and senior-level management use BIM cloud 360. They track as well as collaborate with teams regarding updates and issues. Additionally, when using them, both programs need connectivity so that supervisors and workers are in contact. Therefore, Revit models must be uploaded and published into the BIM cloud 360 and this guide focuses on publishing these models to the cloud.
What is the Difference Between Revit and BIM 360
Both programs are for users working on the same project or designing any model. They are necessary for design collaboration. BIM 360 is cloud software and contains many models for a user. This contains drafting and drawing files, specifications, and layers of the published and shared model. Users can create the design file in any CAD software. BIM is the overall process of creating a 3D database in the form of a model of information that pertains to the design of the building. On the other hand, Revit is one of the CAD software where users can model 3D designs and drafts. BIM 360 document management can contain and use many CAD software files that contain 3D models of buildings.
Looking for CAD drafting services? Designing Drafting is a well-known name for CAD and BIM. Hire our experts for high-quality and cost-effective services.
How to Publish in Your Files from Revit
There are two options for publishing in the BIM cloud. You can use two methods, and you can choose either depending on your ease and availability. Traditionally, you can use Manage Cloud Models in the Collaboration Tab. On the other hand, you can directly perform it from the synchronize with central in the collaboration Tab. Mostly the former option is common and it takes time for uploading the entire model. However, we will focus on both of them.
Option 1- Publishing From the Synchronize with Central
This is an easy and convenient method for publishing your model. Follow these steps for proper and successful uploading.
Tip: Industry practices suggest the use of BIM. Building Information Management increases accuracy, productivity, and coordination while reducing risks and costs.
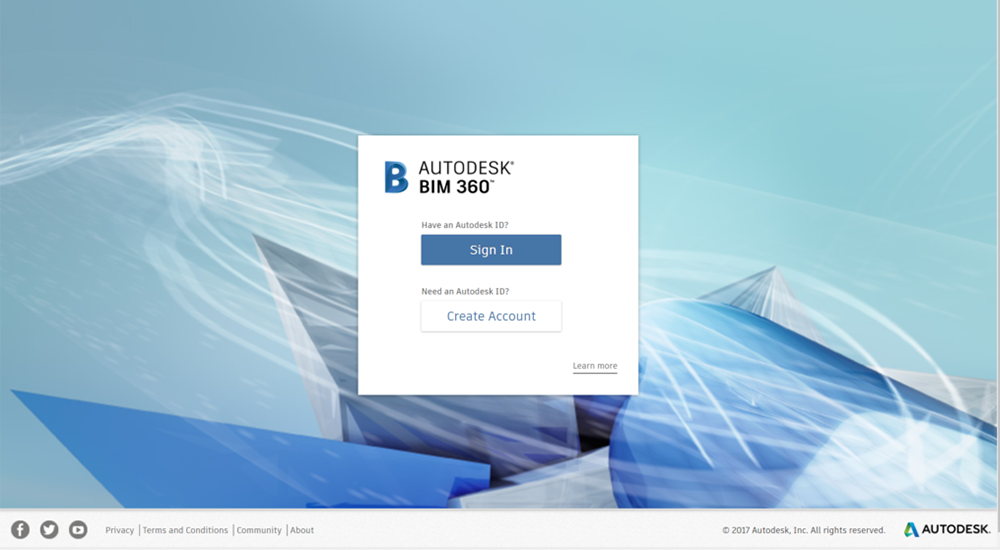
Step I: Login into Your Account
From Revit, login into your BIM 360 account. If you don’t have one, create it first.
Step II: Open Project File (From the Directory)
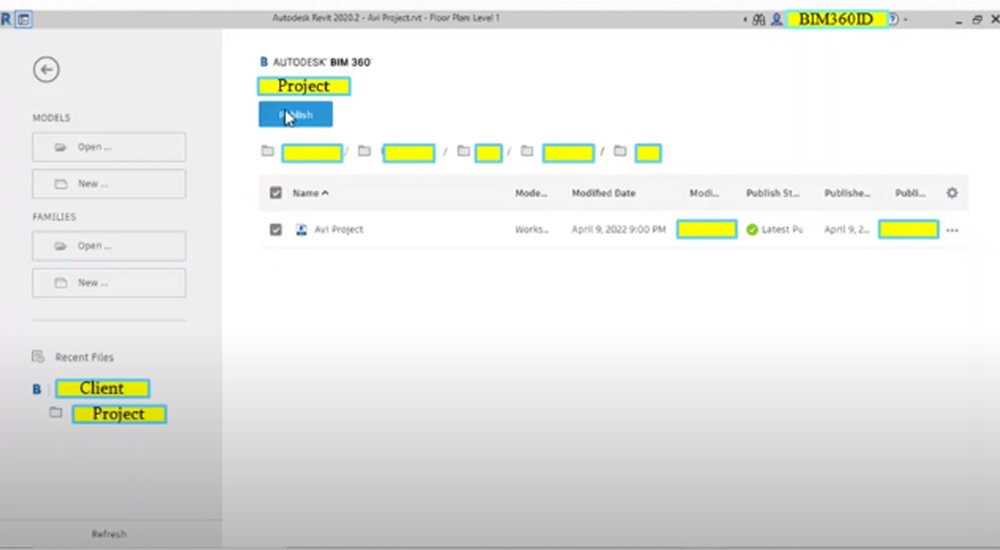
Now go to Revit and open your project file. If it is your CAD model or design file, you can access it from the pathway or directory. Engineers and architects often save their work according to the work requirements and it should be accessible. Certainly, you will be able to see VIEW NAME, BIM360ID, and VIEW NAME tags to ensure that the file is correct.
Next, click on the COLLABORATE tab, and click on Synchronize with Central. Click it and you will be directed to the Autodesk BIM login page on your default browser.
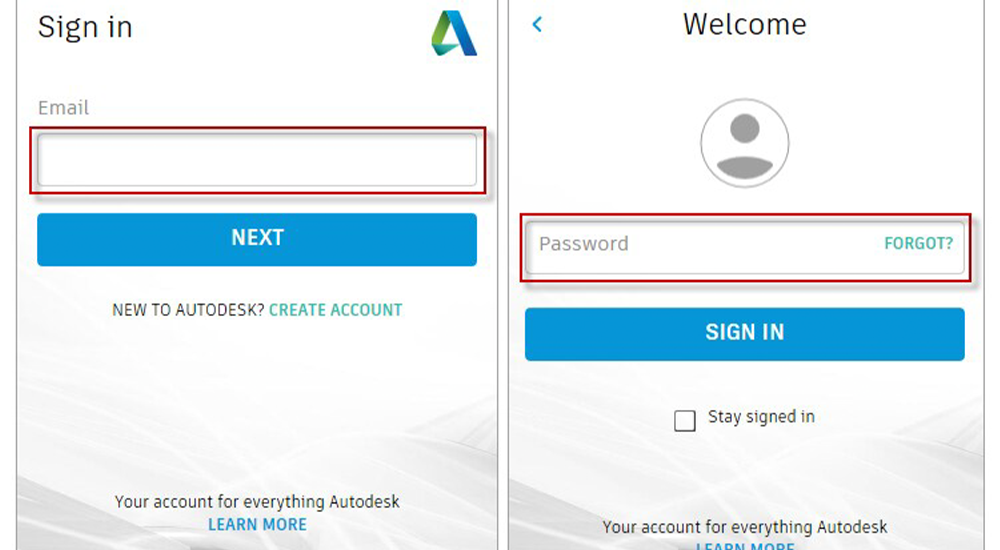
Step III: Login to Synchronize
The below image is from the login page of BIM 360 software, enter your email and password.
After successful login, you will see the home page. This is the BIM 360 Document Management page. Additionally, it enlists your projects, folders, and subfolders with title and BIM360 ID against each file.
Step IV: Click on Home
Now go back to Revit software where you have your CAD files or designs. Furthermore, save your work and find the Home button next to the Files button. Click on it.
Step V: Check the Box in front of the Project File
Afterwards, the Home button will open your homepage. Furthermore, here you can select the design file of your model or drafts.

Step VI: Click The Publish
Tick the check box of the file and click the PUBLISH button.
Step VII: From Pop-up, Click on Publish and See Result
Next, a pop-up will appear to show you the destination folder and your file. Next, click the PUBLISH button and your task is now saved and synchronized.
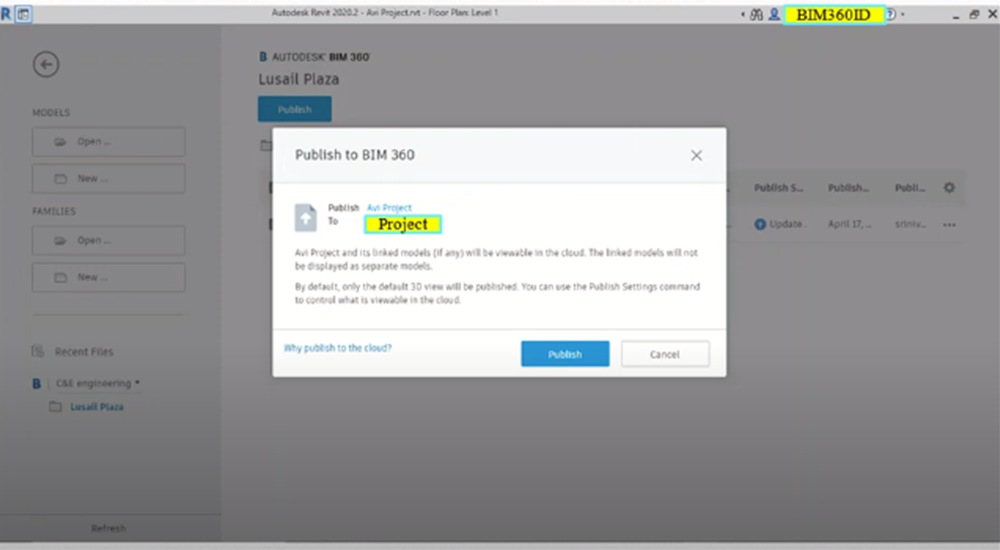
Moreover, it will process and publish your file within some time. You can open it in BIM 360 and view your project.
Option 2- Publish from Manage Cloud Models
This method is also supported but is slower in performance. Follow the below steps to perform publishing using this method.
- Initially, save your work and decide about the WORKSHARED model (Shared or Saved).
- Next, click the Collaborate tab and select Manage Cloud Models.
- Afterward, select your design Project.
- From the available models’ list, click on the model and then click publish.
- Finally, the latest publish icon will change indicating the latest publish.
Tip: Use Manage the Cloud option for publishing your projects. It is recommended and is fast.
Conclusion
The REVIT BIM Services use many tools (CAD) and software (AutoCAD) to design and draft projects. These are available widely but collaboration is important between teams and management. Revit and BIM 360 ensure collaboration and easy management of the project. Publishing the Revit model is easy and useful for teams and users working on the same project. This guide is a complete set of instructions for publishing your project. Moreover, you can use the aforementioned 2 methods according to ease. Your goal should be learning more to actively collaborate with your team and deliver the projects on time.
Related Posts
Call Us Now
+1 (708) 381-0900
For more Query
info@designingdrafting.com

